G. Sculpt-a-Sound -Micro:bit
Micro:bit Musicians: Design & Code Your Own Instrument!
Learning Goals:
- Learn how to use the Micro:bit’s touch sensors.
- Code the Micro:bit to play different musical notes.
- Design and build your own musical instrument using cardboard and other craft materials.
- Explore how technology and art can come together!
Materials You’ll Need:
- Micro:bit and battery pack
- Computer with internet access (for MakeCode editor)
- USB cable for the Micro:bit
- Cardboard
- Aluminum foil
- Alligator clip wires (at least 3-4 per student/group)
- Glue
- Scissors
- Markers, paint, and other craft supplies for decorating 🎨
Activity Steps:
Part 1: Coding Your Micro:bit 💻
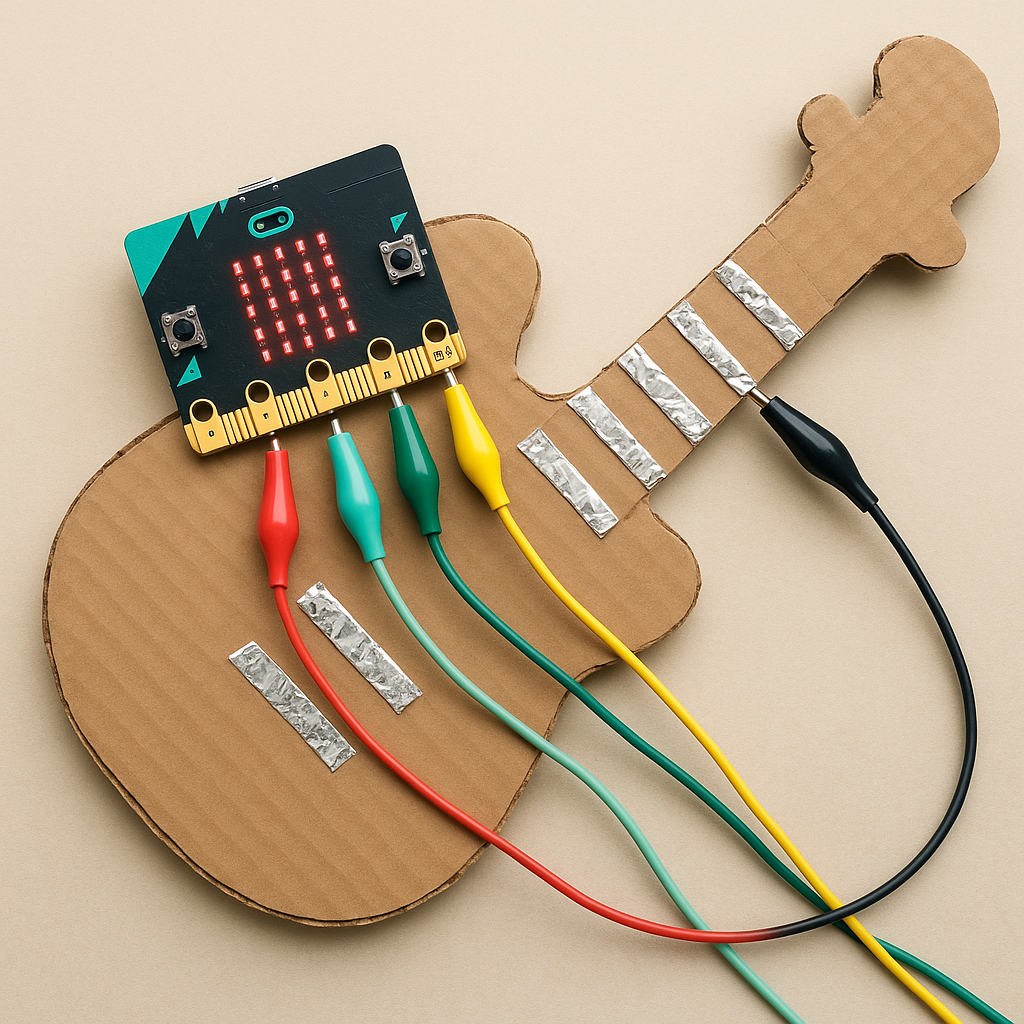
- Inspiration from the Video: Remember how the guitar in the video used aluminum foil strips connected to the Micro:bit? We’ll use a similar idea! Each strip will become a “touch” button for a note.
- Go to MakeCode: Open the MakeCode for Micro:bit editor on your computer.
- New Project: Start a new project.
- On Pin Pressed:
- From the
Inputdrawer, drag out anon P0 pressedblock. (You can change P0 to P1 or P2 later for more notes). - This block means: “When Pin 0 is touched…”
- From the
- Play a Note:
- From the
Musicdrawer, drag aplay tone Middle C for 1 beatblock and place it inside theon P0 pressedblock. - You can click on “Middle C” to choose different notes and on “1 beat” to change how long the note plays.
- From the
- Create More Notes:
- Right-click on the
on P0 pressedblock and choose “Duplicate.” - Change the new block from
P0toP1. - Choose a different note for this new pin.
- Repeat this for
P2(or even more pins if your design needs them!). This is how the video made different sounds for different parts of the guitar. - Go to this link to learn how to make chords
- Right-click on the
- Ground Connection: Just like in the video, you’ll need a ground connection. We’ll connect one of the Micro:bit’s
GND(ground) pins to a piece of foil that you’ll touch at the same time as your note “buttons.” - Download: Connect your Micro:bit to the computer with the USB cable and download your code to it.
Part 2: Building Your Instrument 🛠️
- Design Time!:
- Guitar: You could make a cardboard guitar neck with foil “frets” (like the video). The body of the guitar would have a larger piece of foil for the ground connection.
- Drums: Think about creating different “drum pads” out of cardboard and foil. Each pad could be a different pin (P0, P1, P2) and play a different drum sound or note. You’ll need a separate foil spot for your ground connection.
- Keyboard: Design a mini keyboard with foil “keys.” Each key connects to a different pin, and you’ll have a ground strip to touch as well.
- Your Own Idea!: Be creative! What other kind of instrument could you make?
- Construct Your Instrument:
- Cut out your cardboard shapes.
- Carefully glue aluminum foil onto the parts you want to be touch-sensitive (your “notes” or “drum pads”). Make sure the foil is smooth and secure.
- Create a separate, larger foil area for your
GND(ground) connection. This is the part you’ll touch with one hand while you touch the note “buttons” with the other, just like they showed for the guitar [02:34].
- Wire It Up!:
- Use alligator clips to connect one end of a wire to a foil “note” on your instrument.
- Connect the other end of that same wire to the corresponding pin on your Micro:bit (P0, P1, or P2).
- Use another alligator clip wire to connect your foil
GNDarea on your instrument to one of theGNDpins on the Micro:bit. The video used a black wire for this [02:21].
- Decorate!: Make your instrument look amazing with markers, paint, and other craft supplies.


Part 3: Let’s Make Some Music! 🎶
- Test it Out: Make sure your Micro:bit is powered on.
- Play!: Touch the
GNDfoil with one hand (or part of your arm). With your other hand, touch one of the foil “notes” on your instrument. You should hear a sound! - Upgrade your sound: Use the “on shake” feature to play more music
- Troubleshooting:
- No sound? Check your alligator clip connections. Are they firmly attached to the foil and the Micro:bit pins?
- Is your code downloaded correctly?
- Is the foil for your notes and ground smooth and not torn where the clips attach?
Share Your Creations!
- Once your instrument is working, be ready to show it off and play a little tune for everyone!
- Talk about your design choices and any challenges you faced.