2. Onion Cell Analysis

Instructions (Part I): Peel a small section of the outer layer of the onion. This layer is easier to handle and typically provides a thin enough sample that does not require further slicing. Using scissors or a sharp knife, cut a very small piece of this layer. The piece should be thin enough to be nearly transparent. See image below: 

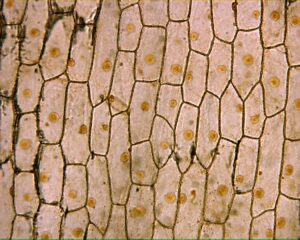
Instructions (Part II): Place the onion sample in the center of the microscope slide. If the sample curls up, use tweezers to flatten it gently. Apply a drop of water over the onion piece. If you’re using iodine solution, apply a drop of iodine instead. Iodine stains the cells, making the nuclei and certain cell structures more visible. Like you did in the “letter e” lesson, gently place a cover slip over the sample, being careful to avoid air bubbles. If air bubbles are trapped, gently tap the cover slip with the end of the tweezers to dislodge them. See below video for assistance if needed: 

Instructions (Part III): Secure the slide on the microscope stage using the stage clips. Begin with the lowest power objective lens. Use the same focusing techniques you learned during the “letter e” activity. Use the coarse focus knob to find the initial focus and then switch to the fine focus knob to clarify the image. Once focused, switch to a higher power objective for a more detailed view. Adjust the focus as needed. Observe the general layout of the onion cells, noting the cell walls, nuclei (stained darker if iodine is used), and any other visible structures. See image below as a reference: 

Instructions (Part IV): Upload a clear image of your onion cells by aligning your phone lens directly on the microscope.  Click here for assistance if needed.  Type your first name in the “Subject” area. A QR code is provided for ease of upload. 

Made with Padlet