3. Cheek Cell Analysis

Instructions (Part I): Each student should gently scrape the inside of their own cheek with a clean toothpick. This method should be gentle to avoid discomfort. Transfer the cells by stirring the toothpick in a drop of methylene blue  placed in the center of a clean microscope slide. This will help highlight the cells’ nuclei and other internal structures, making them easier to observe. Using techniques similar to those learned in the “letter e” and onion cell labs, place a cover slip over the sample. Start at one edge and gently lower it across to minimize air bubbles. If bubbles are trapped, gently tap the cover slip to dislodge them, as practiced in previous labs.

See video below for additional instruction: 

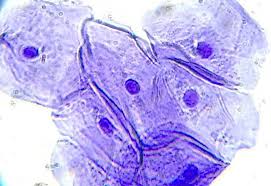
Instructions (Part II): Secure the slide on the microscope stage with the stage clips. Begin with the lowest power objective and use the coarse focus knob to find the initial focus, then refine with the fine focus knob, similar to the focusing techniques used in the “letter e” and onion cell labs.  Observe the structure of their cheek cells, noting the cell membrane (outside), cytoplasm (inside), and nucleus (dark portion in the middle that contains the DNA). See image below as a reference: 

Instructions (Part III): Compare and contrast the cheek cells to the onion cells observed earlier. What differences do you notice in the shape of the cells, the thickness of the cell walls in onion cells versus the more flexible cell membranes in cheek cells, and the visibility of the nucleus in each type? Hypothesize a reason for these differences and share with your partner and/or group. 

Instructions (Part IV): Upload a clear image of your onion cells by aligning your phone lens directly on the microscope.  Click here for assistance if needed.  Type your first name in the “Subject” area. A QR code is provided for ease of upload. 

Made with Padlet