Day 2: Building Rockets!
Paper Stomp 🚀 Instructions
Stomp Rocket Planetary Mission
🚀 Objective:
We will design, build, and launch their stomp rockets with the goal of completing a space mission. Rockets will be scored based on flight performance, landing accuracy on planets, and trajectory challenges (such as passing through a hula hoop).
Rocket Construction Steps:
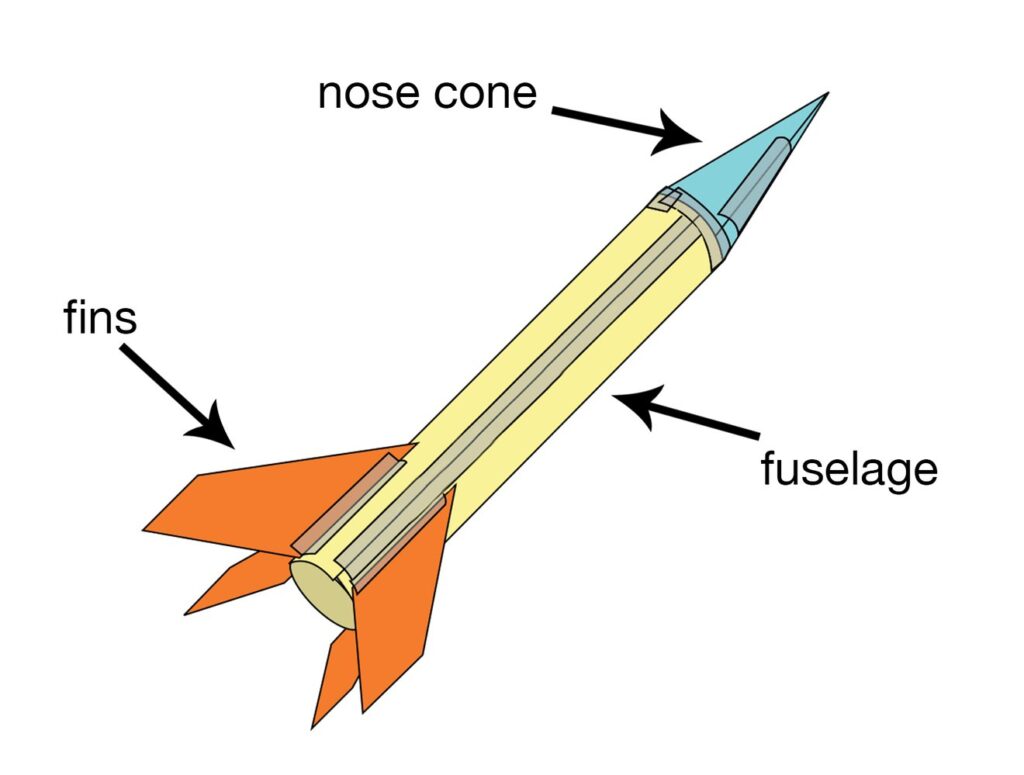
Form the Fuselage:
- Take a sheet of paper or cardstock and roll it around the 3D-printed template tube.
- Tape it securely to maintain shape (do not tape it to the template!).
- Carefully slide the paper tube off the template—this is the rocket’s body.
Seal the Top with a Nose Cone:
- Cut a small circle of cardstock or paper and cut a slit to the center.
- Overlap the edges to form a cone and tape it shut.
- Tape the cone securely to the top of the fuselage (closed end).
- For better aerodynamics, use a small piece of foam inside the cone for weight.
Attach Fins for Stability:
- Cut three or four fins from paper or cardstock or foam.
- Tape or glue them symmetrically to the bottom of the fuselage.
- Experiment with different fin shapes to see how they affect flight.
Decorate (Optional):
- Use markers, stickers, or colored paper to personalize the rocket.
- Name your rocke

🌍 Mission Setup: Launch from Earth
- Inflatable planets are arranged at varying distances from the stomp rocket launcher, simulating a journey through space.
- A hula hoop is positioned between Earth and deep space, representing an orbital or gravity assist challenge.
- Different planet targets offer different point values, based on difficulty.
🛰️ Scoring System: Flight Performance & Challenges
🚀 1. Flight Performance Points
| Flight Achievement | Points |
|---|---|
| Rocket flies straight and stable | +3 |
| Rocket reaches high altitude (top 30% of launches) | +3 |
| Rocket has a smooth trajectory (no spiraling) | +2 |
| Rocket shows a creative or innovative design | +2 |
🌍 2. Planetary Landing Points
| Landing Location | Points |
|---|---|
| Lands on a planet (touches inflatable planet) | +5 |
| Lands within 1 foot of a planet | +4 |
| Lands within 2-3 feet of a planet | +3 |
| Misses all planets but lands in space | +1 |
| Crashes back on Earth (falls near launch area) | -10 |
🌀 3. Bonus Challenges
| Challenge Completed | Points |
|---|---|
| Passes through the hula hoop (simulating orbital insertion) | +4 |
| Flies over the entire solar system (longest distance) | +3 |
| Closest landing to a selected deep-space target (Jupiter, Saturn, etc.) | +3 |
🏆 Final Score & Awards
At the end of the competition, total up the points. Award categories could include:
🏅 Best Overall Rocket (highest score)
🏅 Best Flight Stability (highest flight performance points)
🏅 Most Accurate Landing (closest to target planets)
🏅 Best Engineering Design (creative or innovative rocket) 🚀
🚀 Baking Soda & Vinegar Bottle Rocket Instructions 🚀
🎯 Objective:
Students will design, build, and test their own bottle rockets using a chemical reaction between baking soda and vinegar to generate thrust! 🌡️🔥
🛠️ Step 1: Gather Materials
✅ Plastic bottle (small soda bottle works well) 🥤
✅ Baking soda 🥄
✅ Vinegar 🧪
✅ Three pencils ✏️✏️✏️
✅ Tape
✅ Cork or rubber stopper (must fit the bottle opening snugly) 🏗️
✅ Tissue or small paper towel piece 🧻
🛠️ Step 2: Building the Rocket
Attach the Pencils as Legs: ✏️✏️✏️
- Tape the three pencils evenly around the sides of the bottle, ensuring the erasers point downward.
- This will form a tripod stand, keeping the bottle stable with the opening facing upwards. 🏗️
Prepare the Baking Soda Packet: 🥄
- Place a few teaspoons of baking soda onto a small piece of tissue or paper towel.
- Fold it into a packet small enough to fit inside the bottle opening without unfolding. 📦
🌡️ Step 3: Launch Preparation
Add Vinegar: 🧪
- Pour a few inches of vinegar into the bottle.
- Make sure the vinegar does not touch the baking soda packet yet.
Set Up Outdoors: 🌳
- Place the bottle on a flat surface in an open area, free from obstructions.
- Ensure everyone is standing at a safe distance from the launch site. 📏
🚀 Step 4: Launching the Rocket
Drop the Baking Soda Packet: 🥄
- Quickly insert the baking soda packet into the bottle.
- Immediately seal the bottle with the cork or rubber stopper. 🏗️
Step Back & Observe! 👀
- As the baking soda and vinegar react, carbon dioxide gas builds up pressure. 💨
- Once the pressure is high enough, it forces the cork out, propelling the rocket into the air! 🚀🎉
🧪 Step 5: Experiment & Improve
✅ Adjust Ingredient Ratios: Try different amounts of vinegar and baking soda to maximize flight height. 📈
✅ Refine Stability: Modify the pencil stand to keep the rocket balanced. ⚖️
✅ Track Results: Record flight height and distance for comparison. 📊
⚠️ Safety Note: 🚨 Always allow time between launches to clean the bottle and check for damage before reusing. Never point the rocket at anyone or launch near obstacles. 🚧
🌟 Ready to launch? 🚀 Let’s see which team can get the highest and most stable flight! 🏆