Days 1 & 2 (Robotic Arm Control – Part II)

Instructions (Part I): Open your MakeyMakey kit and and carefully lay out all of the materials. See the below image. 

Instructions (Part II): Carefully view the below MakeyMakey introduction video.

Instructions (Part III): Carefully study the below video to learn how to begin using your MakeyMakey. 

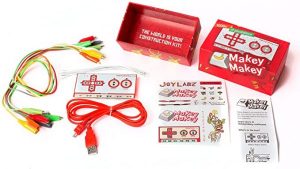
Instructions (Part IV): Using the above video as a guide, the materials in your kit, and the “mLink/mBlock” code you previously wrote, build a MakeyMakey controller for your “Robotic Arm Tank”. In order to recreate the lettered keys “w, r, s, and t” you will need to use jumper cables to connect to the back of your MakeyMakey. Additionally, you may need to change your code to match the available letters. Carefully view the below video for assistance. 

Instructions (V): Record a video of you controlling your “Robotic Arm Tank” with your MakeyMakey controller via bluetooth and share it below. Type your first name in the “Subject” area. A QR code is provided below for ease of upload. 

Made with Padlet