3. Game Control

Instructions (Part I): Open your MakeyMakey kit and and carefully lay out all of the materials. See the below image. 

Instructions (Part II): Carefully view the below  introduction video to obtain a general idea of what the MakeyMakey is capable of. 

Instructions (Part III): Carefully study the below video to learn how to set up your MakeyMakey as a controller for the Scratch game you built earlier. 

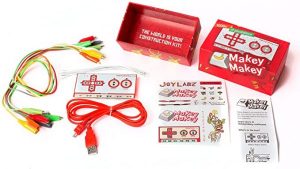
Instructions (Part IV): Using the above video as a guide, and the materials provided, build a MakeyMakey controller for the Scratch game you created earlier designed for an individual with Dyskinetic Cerebral Palsy. That is, button size, ground control, etc., all are designed with this specific physical disability in mind. Below is a video of an individual with Dyskinetic Cerebral Palsy for your planning. 

Instructions (Part V): Record and upload video of you using your MakeyMakey controller to play your Scratch game using limited hand motions to simulate Dyskinetic Cerebral Palsy. Type your first name in the “Subject” area. A QR code is provided below for ease of upload. 

Made with Padlet