
Part D: Drone Construction and Calibration
STEP 1: Now that you’ve learned how to solder wires and components onto a perfboard, it’s time to put those skills to use by starting your DIY ESP32 Wi-Fi Controlled Drone build. This next step will involve some precise soldering, so everything you’ve practiced so far will come in handy. Don’t worry—you’ll be returning to the MakeyMakey project later when it’s time to build a custom DIY controller for your drone. The perfboard controllers you made before will be useful for that, and you might even need to make a few more. For now, focus on carefully watching the video below and begin building your drone step by step.
NEW Motor Wiring Diagram
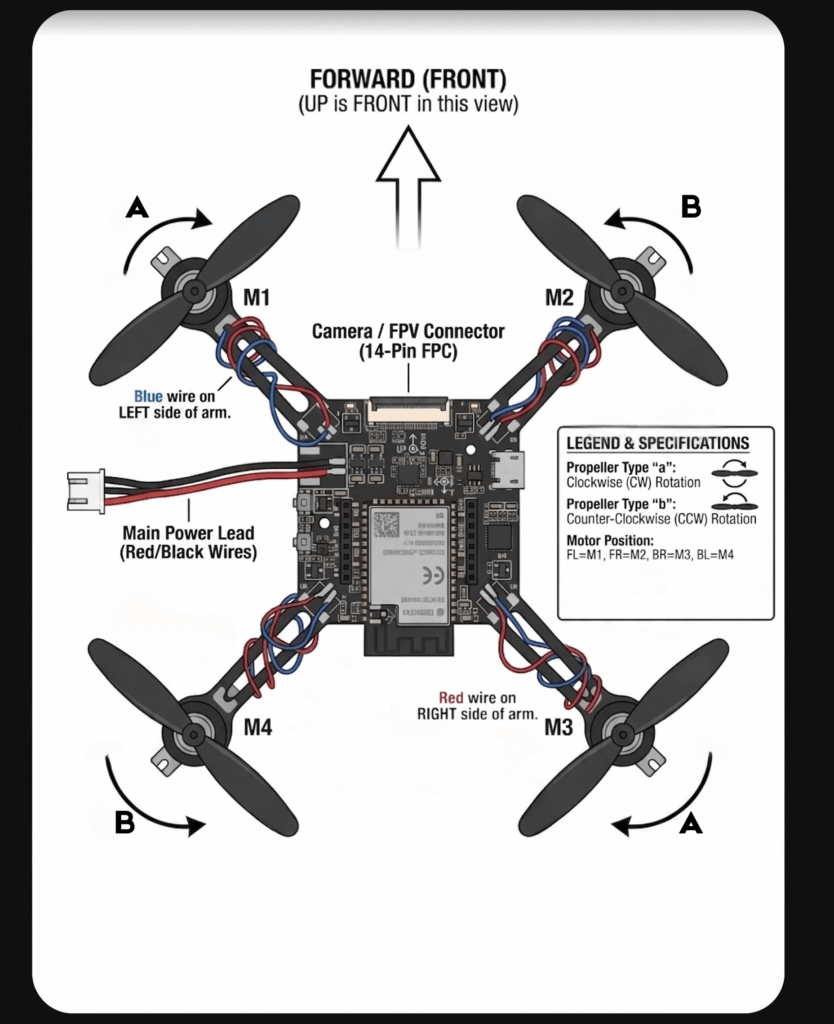
Wiring NEW Motors and Installing Propellers
What you have in front of you
- 1 drone frame with the ESP32 board in the middle
- 4 motors — all four are identical, with red and blue wires
- 4 propellers — these come in two types, “A” and “B”, which look almost the same but are mirror images of each other (two of each)
- A LiPo battery — leave it disconnected for now
⚠️ Safety: Keep the battery unplugged until you reach the test step. Motors are small but they will spin fast enough to nip a finger or grab hair.
Step 1 · Orient the drone
Place the drone flat on the table so the front sensor module is pointing away from you. The micro-USB port should be on the right side.
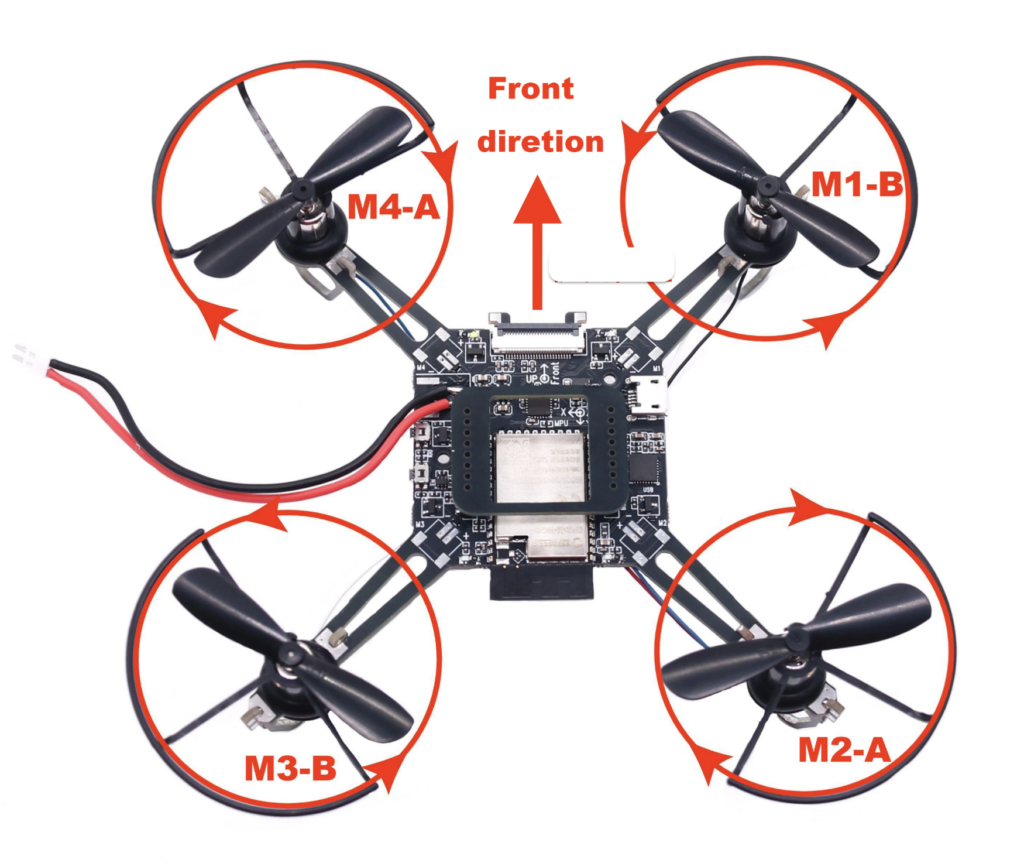
The four motors are labeled on the board:
| Position on drone | Label | Spin direction | Propeller type |
|---|---|---|---|
| Front-left | M4 | Clockwise (CW) | A |
| Front-right | M1 | Counter-clockwise (CCW) | B |
| Back-left | M3 | Counter-clockwise (CCW) | B |
| Back-right | M2 | Clockwise (CW) | A |
Notice the pattern: the two motors on one diagonal spin one way, the two on the other diagonal spin the other way. This is what keeps the drone from spinning uncontrollably in the air.
Step 2 · Wire the NEW motors (M4 and M2)
For M4 (front-left) and M2 (back-right), wire them this way:
- RED wire → “+” pad on the PCB
- BLUE wire → “−” pad on the PCB
Solder the wires neatly. Try to make the BLUE wire run on the right side of the arm (looking outward from the PCB toward the motor) and RED on the left side — it just keeps things tidy.
Step 3 · Wire the CCW motors (M1 and M3)
For M1 (front-right) and M3 (back-left), wire them the opposite way:
- BLUE wire → “+” pad on the PCB
- RED wire → “−” pad on the PCB
This is the part that always trips people up. Half the motors get wired one way, half get wired the other way. Don’t worry — there’s a reason:
Why are two of them backwards? Last year’s kit had two different kinds of motors (some with red/blue wires, some with white/black wires), so you could plug them all in “colored wire to +” and they’d naturally spin in opposite directions. This year all four motors are identical, so we have to do the work the motors used to do — by reversing the polarity on half of them.
Step 4 · Test the spin directions — propellers still OFF
Before you touch the propellers, you’re going to power the drone up and check that each motor spins in the right direction.
Place the drone flat on the table and don’t touch it during boot.
Plug in the battery.
Connect to the drone with the app.
Give a small amount of throttle — just enough that the motors spin.
Look straight down at the drone from above and check each motor:
- M1 (front-right) → spinning counter-clockwise ✓
- M2 (back-right) → spinning clockwise ✓
- M3 (back-left) → spinning counter-clockwise ✓
- M4 (front-left) → spinning clockwise ✓
If any single motor spins the wrong direction, power off and swap that motor’s red and blue wires at the PCB pads. Don’t touch the other motors.
Repeat the test until all four spin correctly.
Step 5 · Install the propellers
Now match propellers to motors:
- A-propellers go on the CW motors → M4 (front-left) and M2 (back-right)
- B-propellers go on the CCW motors → M1 (front-right) and M3 (back-left)
Install each propeller with the curved/scoop side facing UP (toward the sky). Press it firmly straight down onto the motor shaft — don’t rock it on. The propeller should spin freely without rubbing against the motor body.
Quick sanity check: when the motor spins, the leading edge of each blade (the thicker, rounded edge) should be hitting the air first. If it looks like the blade is “scooping backwards,” the prop is upside-down — pop it off and flip it.
Step 6 · First flight
- Place the drone on a flat, still surface.
- Plug in the battery — don’t touch the drone for 10 seconds while it calibrates its sensors.
- Wait until the app says “Ready to fly” (or similar).
- Fly over a soft surface for the first time — carpet, grass, or a towel on the floor — in case it tips or falls.
If the drone lifts off and spins uncontrollably in place, one of three things is wrong:
- A motor is spinning the wrong direction (go back to Step 5)
- A propeller is on the wrong motor (swap A↔B)
- A propeller is upside-down (flip it)
If the drone flies into the ground instead of lifting, all four propellers are upside-down. Flip them.
Common mistakes to avoid
- Wiring all four motors the same way. They have to be wired in two patterns (CW pair one way, CCW pair the other way). Asymmetric wiring is correct.
- Installing propellers upside-down. The curved side faces the sky.
- Mixing up A and B propellers. Look carefully — they’re mirror images.
- Holding the drone during boot. The sensor calibration will fail and it won’t arm.
- Flying with a weak battery. If your drone reboots mid-flight, charge or swap the LiPo.
When in doubt
Stop, look at the wiring diagram, and re-check Step 3 vs. Step 4 — that’s where 90% of build errors happen. Ask an instructor before powering up if anything looks different from the diagram.
Woven Drone Propeller Diagram
STEP 2: Now that your drone is built and flight-ready, it’s time to pay special attention to battery stewardship. The power of your battery has a direct impact on how well your drone flies—lower battery levels can lead to sluggish lift, instability, or sudden drops. Before each flight session, make sure your battery is fully charged, and always keep a backup battery charging while you fly. Inside the WovenDrone app, watch the battery percentage display carefully—it tells you exactly how much power is left. Never let the battery drain completely, and avoid flying if the charge is low. Refer to the image below for the proper charging setup, and be sure to follow all safety guidelines when handling and charging your batteries. Taking good care of your batteries means more flight time, better performance, and fewer surprises in the air.

STEP 3: Now it’s time to fly your drone using the LiteWing app (Apple download) (Android download) shown in the video. Tap the Settings button at the bottom to adjust the control mode—this changes how thrust, yaw, pitch, and roll are controlled. Use this video to better understand how yaw, pitch, and roll work in drones. Pay close attention to the thrust percentage, as it shows how much power is being sent to the motors (see image below). Keep experimenting with the settings and flying until you feel confident taking off, landing —connecting, disconnecting, charging, and helping others too. These drones can be tricky, but you’ve got this! Once your have the basics down, you will go through a systematic process to better understand the nuances of the drone in “STEP 3” below.

STEP 4: Now that your drone is flying, spend time carefully practicing and paying attention to how it behaves. Use the ESP Drone app to test one movement at a time—thrust, pitch, and roll. (Yaw is usually off by default.) Notice how your drone lifts off, how stable it feels, how it moves forward or to the side, and how it responds when you let go of the controls. Try different battery levels and see how performance changes. Use a notebook or a shared doc to jot down simple observations:
- What helps the drone hover better?
- What makes it unstable?
- What happens if you give it too much thrust or tilt?
The goal is to learn how it behaves, not just fly around randomly. Treat it like you’re training with a machine you built—because you are.
STEP 5: Once you’ve practiced enough to feel comfortable, test your control with a few simple challenges. Try to:
Hover steadily for five seconds without drifting.
Fly forward about five feet, then land on a marked spot.
Lift off, move forward slightly, then back, and land again.
These don’t have to be perfect—just clean and intentional. Once you’ve nailed these three moves, you’re ready for more advanced flying or to start thinking about building your own controller. Once successful, upload of a specific flight pattern you are particularly proud of using the QR code below . In the “Subject” area, include your first name and/or your team members’ names.
Want to know more about the ESP32 Drone? Click here