Part C: Customized MakeyMakey Buttons
STEP 1: Before you move on to more advanced MakeyMakey interfaces, watch the videos belows to learn how to strip, solder, and heat-shrink wires. Soldering two wires together is a key skill that you’ll use throughout this workshop.
STEP 2: Practice wire stripping, soldering, and heat shrinking using the tools provided. When finished, upload an image of a soldered and heat-shrunk wire you’re particularly proud of using the QR code below . In the “Subject” area, include your first name and/or your team members’ names. Click here to see all uploaded media.

STEP 3: Now that you’ve learned basic soldering, it’s time to take the next step and create your own soldered breadboard, called a perfboard. Perfboards—short for perforated boards—are a type of circuit board used to build permanent versions of the temporary circuits you’ve made on a breadboard. Unlike breadboards, which are great for quick prototyping, perfboards require you to solder components in place, making your circuit more durable and long-lasting. This is a key step toward making real-world electronics projects. To understand what a perfboard is and how to build a circuit on one, carefully watch the videos below. They’ll walk you through the layout, planning, and soldering process so you can confidently create your own working circuit which you wil eventually use to control a MakeyMakey (and your drone in later weeks!)
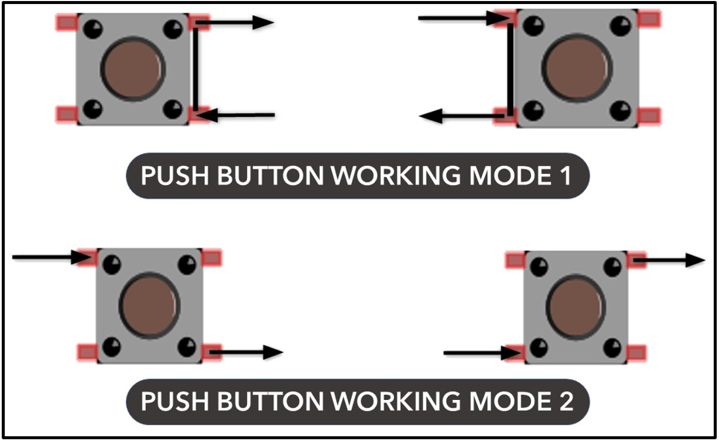
STEP 4: Now that you’ve practiced breadboarding and soldering, it’s time to apply both skills using a perfboard! Recreate your push-button LED circuit from Part A—this time on a perfboard. Wire it the same way, but solder the connections using the techniques from the videos. Use extra wire as needed. See below for example image of completed perfboard circuit (battery not conneted) and an image to remind you of the possible options for wiring the button.

STEP 5: Upload a video showing your functional push-button LED circuit soldered onto a perfboard using the QR code below. In the “Subject” area, include your first name and/or your team members’ names. Click here to see all uploaded media.
STEP 6: Your goal now is to bring all that you have learned together to create a controller with two push buttons on a new perfboard, each triggering a different key on the Makey Makey. Both buttons will share the same ground. Follow the steps below carefully and click here to explore a similar process. While it doesn’t use a perfboard, it does involve soldering buttons to a common ground and connecting them to various MakeyMakey keys. (note: feel free to create a more advanced controller with more than two buttons if you like).
- Solder two push buttons onto your perfboard.
- Solder one leg of each button to a shared ground wire.
- Solder wire to connect both buttons to one common ground line. This wire will later connect to the Earth (ground) on the Makey Makey
- Connect the other leg of each button to a separate wire. Each of these wires will connect to a different Makey Makey input (like Up or Down). This is what triggers the action when the button is pressed.
- Strip, solder, and heat-shrink your wires as needed
- Use alligator clips or other connectors to attach to the Makey Makey
- Press each button to make sure it closes the circuit and sends the signal to Makey Makey.
For an extra challenge (see the first image below), create a push button that lights up an LED when the MakeyMakey circuit is completed and the corresponding computer key press is activated.


STEP 6: Once your controller is working, choose a game, instrument, or any other interactive program (as you did in Part B) to control on your computer and have fun using it. Then, upload a video showcasing your functional MakeyMakey controller circuit—soldered onto a perfboard—using the QR code below. In the “Subject” area, include your first name and/or your team members’ names. Click here to see all uploaded media.