Day 3: Launch Angle Optimization
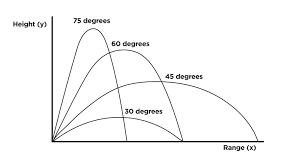
STEP 1: Now it’s time to focus on launching for distance. Head back to the launcher and experiment with two key variables: the angle of launch and the strength of your stomp. Your goal is to find the best combination that gets your rocket to fly as far as possible. Don’t worry about accuracy—this is all about distance. Keep testing, adjusting your stomp, and trying different angles. As always, check your rocket after each launch and make any fixes or changes needed. The below diagram will help you with your testing and analysis. Additionally, DON’T FORGET about what you learned during the projectile motion simulation on Day 1!

STEP 2: Now that you’ve found a good launch angle, it’s time to add another layer of physics—center of gravity. We’ve already talked about Newton’s Laws, projectile motion, and stomp force. Now let’s explore how weight placement affects your rocket’s stability. Read/watch the information below carefully, then try adding a small amount of weight near the front of your rocket. The goal isn’t to make it heavier just for the sake of weight—it’s to help your rocket fly straighter.
When a rocket’s center of gravity is near the front, it stays more stable in the air. If the weight is too far back, the rocket can tip or wobble. A balanced rocket, with most of its weight toward the nose, cuts through the air more smoothly. Click here for more information on center of gravity.
Try it out, test your rocket, and keep making small adjustments as needed. Don’t be afraid to change the location of your weight as you progress! When you are happy with your launch angle, and rocket build write a summary of what you learned and share it using the QR code below. In the “Subject” area, include your first name and/or your team members’ names. Click here to see all uploaded summaries.
