STEP 1: Now we’re going to look at a special type of chemical reaction called an oxidation-reduction reaction. This kind of reaction is all about transferring electrons from one material to another. And if we catch those moving electrons, we can make electricity! It turns out certain metals—like zinc and copper—are really good at this. That’s the basic idea behind how a battery works. Watch the video below to learn more about how batteries use chemical reactions to create energy. Then you’ll build your own!
STEP 2: Let’s get started by setting up your battery cells! Follow the steps below carefully, and check out the images provided to help guide your setup:
Poke one copper nail and one zinc nail through the bottom of each paper cup. Make sure they don’t touch.
Turn all the cups upside down and line them up in a straight row.
Use a marker to label each copper nail with a + and each zinc nail with a –. These nails are your electrodes.
Now start connecting the nails with alligator clips:
Connect the zinc (–) nail in one cup to the copper (+) nail in the next cup.
Keep going until all five cups are connected this way.
Leave the first copper nail and the last zinc nail with one free clip each—these will connect to your LED, buzzer, or motor later.
Your battery is almost ready—but it still needs one more thing: a liquid electrolyte (chemical solution)! Let’s test that next.
STEP 3: Now it’s time to light an LED—but to do that, we need something called an electrolyte. An electrolyte is a liquid that helps carry the electric current between the metals in your battery. Without it, the chemical reaction can’t happen, and the electrons won’t move.
Follow these instructions to power your LED. Check out the images provided to help guide your setup:
Pour 2 tablespoons of Gatorade into each of your five cups. Make sure the alligator clips stay above the liquid.
Take the free copper clip (+) from the first cup and the free zinc clip (–) from the last cup.
Attach these to the legs of your LED:
The longer leg goes to the copper (+) clip.
The shorter leg goes to the zinc (–) clip.
Watch closely—does your LED light up?
You’ve just used a chemical reaction to make electricity!
STEP 4: Once you get your LED to light up, try connecting your battery to another groups battery.
What happened?
Can you light up multiple LED’s?
Are they brighter?
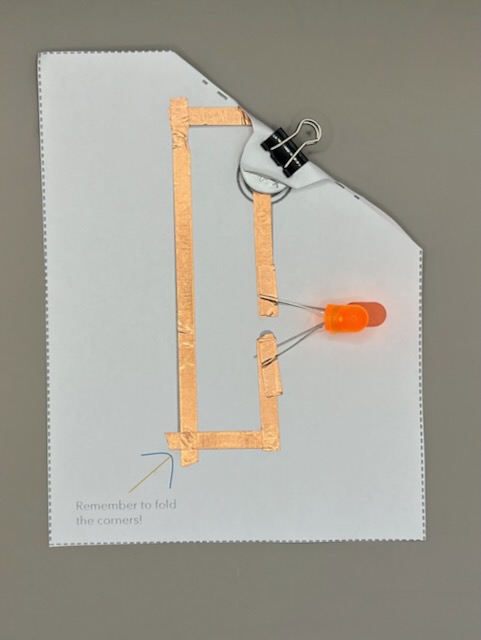
Part 2: Create an Electrical Circuit
Paper Circuits
Your Goal: Create a working LED light.
Materials:
Paper template
Conductive tape
LEDs
3V coin cell battery
Let’s Build:
Plan Circuit:
Battery: + and – sides. LED: long leg (+) & short leg (-).
Draw two conductive tape paths: One from battery (+) to LED (+), another from LED (-) to battery (-).
Construct:
Stick copper tape firmly along your planned paths.
Attach LED: Bend legs flat. Place longer (+) leg on the positive path, shorter (-) leg on the negative path. Secure legs with more copper tape.
Add Battery: Ensure correct sides touch the copper tape paths. A small paper flap or tape can hold it.
Test & Fix: Light on? Great! No light?
Battery direction? LED legs correct? All tape connections tight?
Optional Switch: How can you make a break in the circuit that you can close to turn it on? (e.g., a flap, or pressing the battery down)
3d Printed Circuit
Can you light up 2 LED eyes on your 3d printed item?