Day 5 (Basic Flight & Night Landing Challenge)

Instructions (Part I):

1. Insert the battery (with the tab facing upwards) and slide it in from the rear of the drone as shown below.

2. Charge via the micro USB port on the side as shown below. 

3. On the front of the drone, to the right of the camera, is the drone status indicator LED shown below. 

4. On the opposite side of the micro USB port is the power button shown below. To turn the drone on press this button firmly once. Repeat to turn the drone off. 

5. On the underside of the drone are the vision and position sensors shown below.

6. Charge your drone by ensuring that the power is off and your micro USB cable is fully plugged in. The LED on the front will slowly blink blue and will switch to solid blue when fully charged as shown below. 

Instructions (Part II): Click here to add the “DroneBlocks” application to your Chrome browser. If you would rather program from a tablet or phone, click here for the iPad/iPhone application, and here for Android application. Log into the application using the dropdown menu. 

Instructions (Part III): Watch the below video to learn how to login and save your flight missions to the DroneBlocks Chrome application while offline. (Note: A similar process exists for both iPad/iPhone and Android applications.) 

Instructions (Part IV): Write and implement a code that commands your drone to take off, flip, fly in a square pattern, flip, and land. Initiate your square using a loop. You instructor will model this for you first to make sure that everyone is comfortable connecting to their drone! 

Instructions (Part V): Write and implement a code that commands your drone to take off, flip, fly in a rectangle pattern, flip, and land. 

Instructions (Part VI): Write and implement a code that commands your drone take off and a) fly in a right triangle pattern and b) fly in an equilateral triangle pattern and land. See images below for help and test in simulator first. 

Instructions (Part I): Obtain your circuit materials and analyze the below images. Pay close attention to how the long and short ends of the LED are aligned with the positive and negative sides of a battery. 

Instructions (Part II): Click here to view a short video that demonstrates how to make a simple circuit with a switch. Repeat the process shown in the video using your materials. 

Instructions (Part III): Keeping your circuit from “Part II” in mind, imagine a method for creating a circuit capable of lighting two LEDs. One possible example is shown below. 

Instructions (Part IV): Revise your circuit from “Part III” so that there is more than enough room for your drone to fit in-between the two LEDs. This circuit will be your drone’s “Night Landing Pad”. 

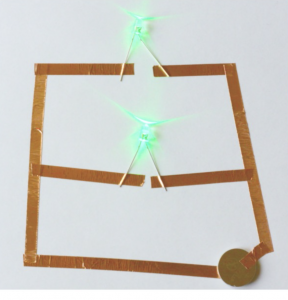
Instructions (Part V): Through trial and error, write and revise a code that commands your drone to take off from an area at least ~ 10 ft from the landing pad, and land in between the two LED lights. Ideally this challenge will be done inside, with the lights off, although that may not be possible given your flight area. Record a video of your closest attempt and share it below. Type your first name in the “Subject” area. A QR code is provided below for ease of upload. 

Made with Padlet